This is the seventh post in the series of 11 steps to follow to achieve success in automated manufacturing systems. If you’re new to this series, you can start with the first step: When to Automate.
In this post, we’re covering Step 7—Project Execution.
- When to Automate
- Where to Start
- Who Should Be Involved
- How an Automation Architect Selects an Equipment Supplier
- The Contract
- Defining the Solution
- Project Execution
- Runoff & Factory Acceptance Test at Supplier
- Operator & Maintenance Training
- Installation, Site Acceptance & Production Start-Up
- Continuous Improvement
To skip ahead and read all 11 steps together in an ebook now, fill out the form below and we’ll send it to you!
Step 7: Project Execution
Project Tasks
- Process planning
- Design engineering and design review
- Component manufacturing
- Sub-assembly
- Final assembly
- Debug time
- Final runoff (Factory Acceptance Test)
- Training
- Installation and startup
Project Management
Buying custom automation is much more complex than purchasing an off-the-shelf
product. The level of partnership and involvement between the user and builder during project execution is highly correlated to the success of the equipment when it’s in production.
The user should be an integral part of the equipment building process, especially for complex custom automation and new processes. The user and supplier should have a regular meeting cadence during which time they review schedules, open issues, risks, completion of tasks, and delivery of materials.
Project managers from both parties should be in continuous communication. To maintain continuity, both project managers should stay with the project throughout the entire process.
Debug
After the equipment is powered on, the builder will start debugging the software and hardware. All custom automation equipment will inevitably have issues.
Issues need to be systematically identified and resolved until the process is stabilized and it meets the user’s acceptance criteria. The debug process typically looks like this:
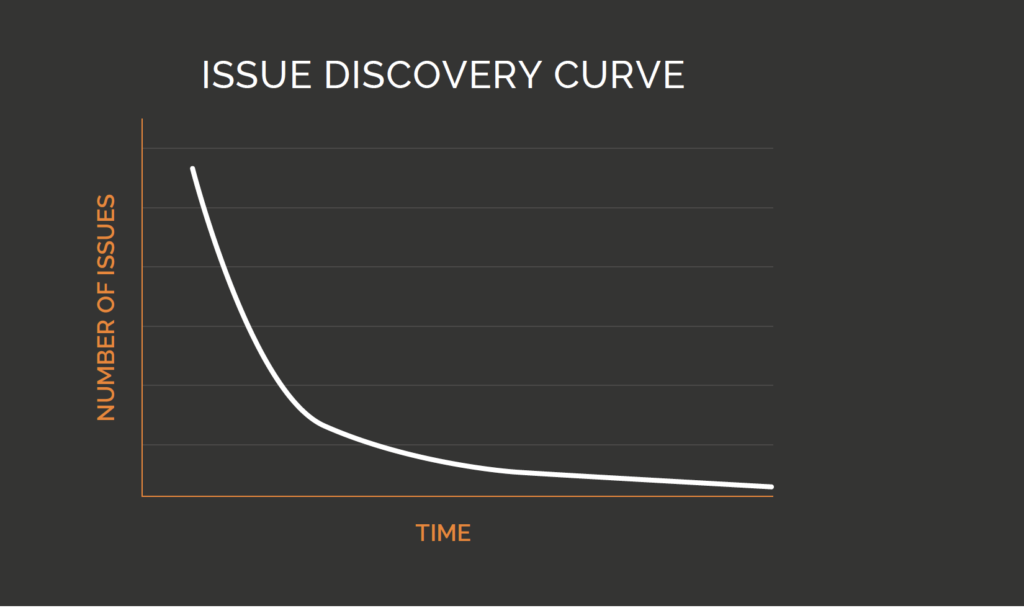
Note that there is a steeper slope at the beginning and that the issues typically never go to zero. The speed with which the team moves down this line will make or break the team’s ability to meet the project’s budget, quality, and schedule requirements.
Three variables have the biggest impact on the slope of this line and the success of the debugging:
1. Number of Parts Run on the equipment
The machines should be run as thoroughly as possible prior to the Factory Acceptance Test. A 100 part run may go very well, but if the equipment is designed to produce 5,000 parts per day, then 100 good parts is not significant. As more parts are run through the equipment, more edge cases will be identified and debugged. Running parts through the equipment may also flush out previously unknown issues about the components.
It is critical for the manufacturer to provide a sufficient quantity of components in order to adequately debug the machine. Some manufacturers may be concerned about the cost and schedule implications of supplying a lot of components for debugging. However, these manufacturers should weigh these costs against their need to have the machine running optimally when production starts.
2. Customer Involvement
Once power-on occurs, it is not uncommon for the user to have their own technical resources at the builder’s site all the way until the Factory Acceptance Test. The manufacturer is an expert in their processes and will be a valuable resource for the builder to consult during the debug phase. On-site involvement speeds up decision making and allows the user to have input throughout the build process.
The user’s technical team and operators will also learn a tremendous amount by seeing the equipment come to life. They will better understand the design intent of the equipment and what trade-offs will be required if they later choose to make changes to the machine. By helping run parts and set up the equipment, they will also reduce their learning curve when production starts.
This involvement also helps the user further develop a robust FAT protocol that truly challenges the system and flushes out issues prior to acceptance.
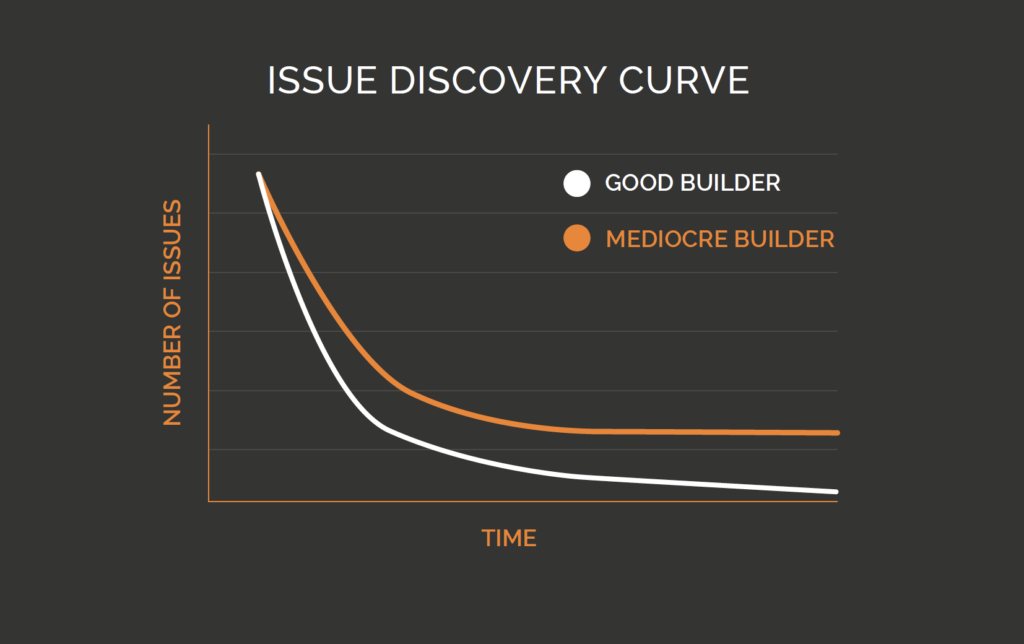
3. QUALITY AND EXPERIENCE LEVEL OF THE BUILDER
A skilled and experienced builder will have seen many types of issues in their past and know how to quickly debug them. A mediocre builder will take longer to debug their equipment and may never get close to zero issues. This can be illustrated by the following chart:
Perspectives on Automation
“In addition to keeping track, we always want to keep the builder apprised of any new developments or changes we wish to make. For example, if I change a hole size slightly, I’m going to let my counterpart at the builder know it immediately. This kind of communication is critical. Whether you can meet your schedule and your budget depends greatly on good communication at this stage. And then I strongly recommend that all obsolete prints be destroyed! Somehow, if any are left out there they will come back to haunt and to cost you.”
Heavy industrial and commercial products manufacturer